

How To Set Up Camera For Proposal
Taking Your Own Proposal Pictures
And then yous're fix to pop the question, you've planned your proposal to a T, and at present you're because how to capture the bodily moment. Maybe you lot're an farthermost DIY'er or there isn't enough time to hire a photographer to help you, but you find yourself considering taking your proposal photos yourself.
Yes, taking your own marriage proposal photos is completely doable; I've done it myself! Read on and I'll tell you how I did it, ripe with details on how you lot can photograph your own proposal using a smartphone or camera.
Quick Summary: How to Photo Your Own Proposal
Hither are the basic steps for how to capture your proposal by yourself:
- Make a program
You lot tin can't take pictures of a proposal…if there's no proposal to accept pictures of. Start by planning your proposal offset..
- Get a advanced photographic camera app or an actual photographic camera
The cardinal to take whatever serious selfie is having an intervalometer, which is only present with actual cameras or advanced camera apps.
- Effigy out how and where to place the camera
You'll demand something to hold your photographic camera while y'all propose. This is where a tripod comes in.
- Practise
Practice makes perfect. In this example, setting upwards the photographic camera or app before popping the question, and then practicing with that setup, volition assistance ensure success.
- Verify everything
If your camera/app supports it, it'due south best to shoot in RAW prototype format. It'southward too a smashing idea to ensure in that location'due south plenty storage space for the possible hundreds of photos that yous'll take while proposing. As well requite some thought to how you'll comprise the photographic camera.
- Make it personal and create copies
After they've said "yeah," edit those photos the way you'd like to and and so back them upwards for safe keeping.
Detailed Step-past-Step: How to Have Your Ain Proposal Photos
Then let's get to it. Here's how to successfully photo your own proposal.
1. Make a Program
Photographing your ain proposal, or taking whatever kind of "serious" selfie at all, is complex. Therefore, the starting time pace is to focus on your proposal itself and finalize that program first. My How to Advise guide has y'all covered. The point is, afterwards all, to go engaged; the photos are secondary.
Both in planning your proposal and executing it, recall what's important!
two. Get an Advanced Camera App
The first item y'all'll demand to take your own marriage proposal photo is, you guessed it, a camera. Cameras these days come in 2 varieties: actual cameras and smartphones (or apps on smartphones, more specifically). Regardless of what type of camera you're going to use, information technology'll need a specific characteristic: an intervalometer. Unfortunately, the stock iOS and Android apps don't offer this feature. But there are solutions…
An in-ter-va-what?
By basic definition, an intervalometer is any device that operates/actuates something on a specified, fixed interval. The input from the person are the interval parameters (eastward.thousand., x operations every y minutes). The output from the device are the bodily actuations, such every bit turning something on/off or, y'all guessed it, taking a picture show.
An erstwhile school example of a common intervalometer is a light timer that you utilize with vacation lights. With the older analog-fashion ones, you use the little plastic tabs to specify how long (i.e. the interval) the light plugged into the timer is on for. (With these older way timers, the operation/actuation is a simple On or Off. In other words, you tin can't specify the quantity of operations; it's exactly 1 On and and so ane Off, then it repeats.)
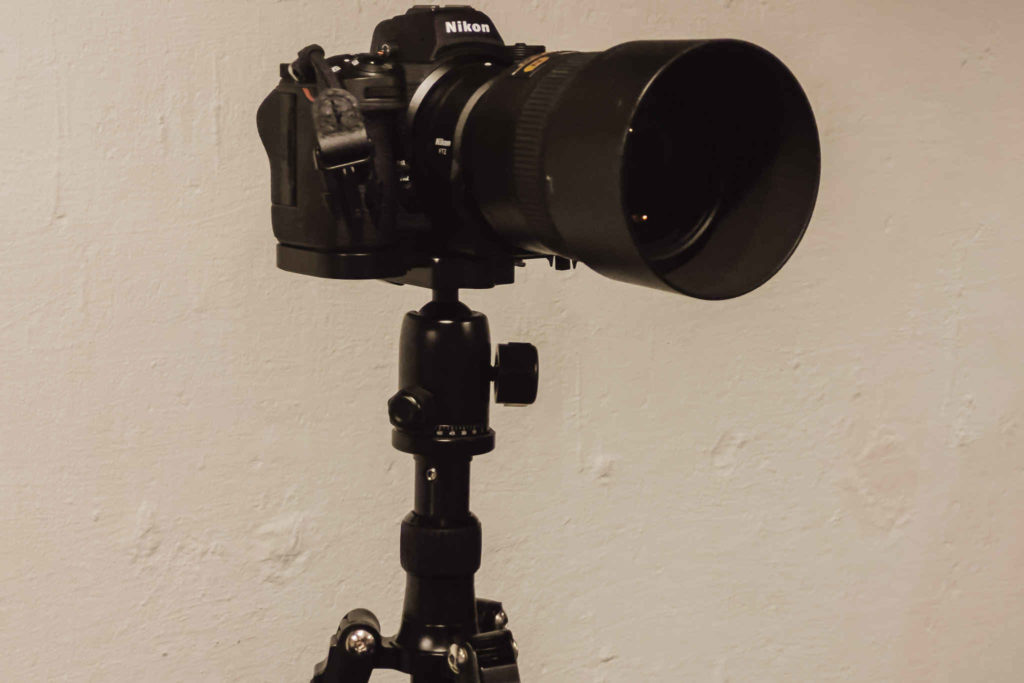
Naturally, if y'all take the concept nosotros're discussing and apply it to digital photography, we're so talking about an electronic device, or app feature/setting, that triggers the camera shutter x times every y seconds/minutes. Past now, you tin probably see why an intervalometer feature is key to taking your own proposal photos. I used a DSLR camera with an integrated intervalometer feature when I captured my ain proposal.
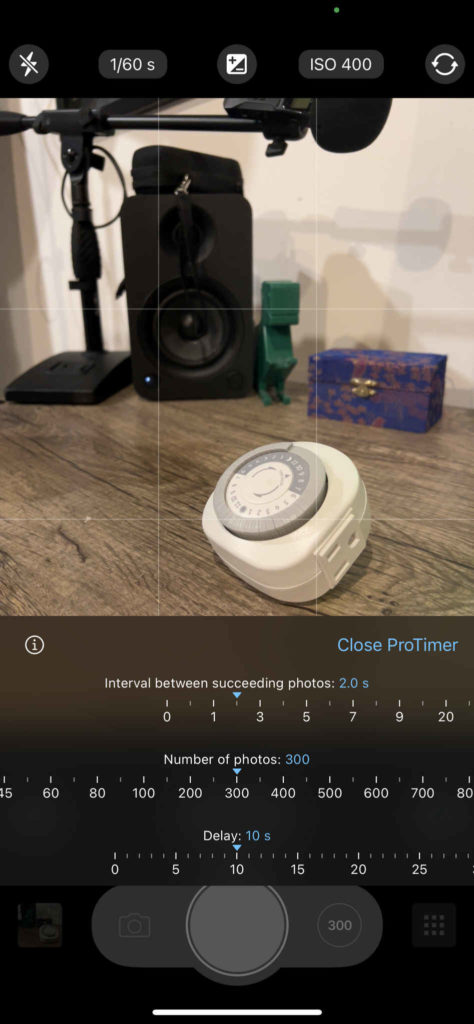
iPhone App Recommendation: ProCamera
Despite my love for Google products, I switched over to iPhone not likewise long ago. So if you demand a camera app to assistance yous shoot your ain proposal, check out ProCamera. This is a full-fledged camera app with tons of slap-up features, including an easy-to-use intervalometer feature called ProTimer. Even with all of this power and these advanced features, ProCamera is just about $15.
three. Determine How to Physically Set Up the Photographic camera
Wait a second, have y'all read my other post, "How to Propose," yet? If non, it would be a practiced thought to take a interruption from this one and cheque it out at present!
Let'south keep things uncomplicated for this part. Still photography cameras are held by one of 2 implements: your easily or a tripod. Apparently, you'll want the latter on hand when taking your own proposal photos (no pun intended). The two main components of a standard tripod are the legs (there are iii of them) and the head. The camera sits on the head and the legs are commonly adjustable in length.
Now, the type of tripod y'all'll get will depend largely on the Where component of your proposal programme. So refer to that and consider options for where to place the photographic camera and tripod once information technology's fourth dimension to advise.
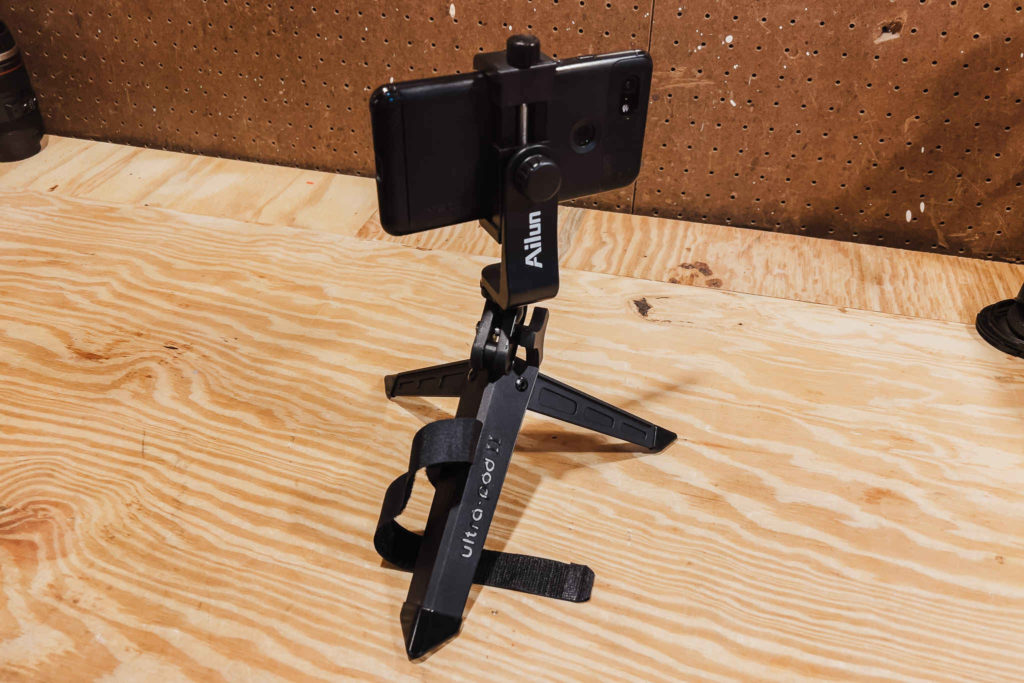
While most cameras have a threaded insert on their bottoms that is made to receive a screw from a tripod, you'll have to become a petty more than artistic if you're using a smartphone to photograph your own proposal. You could get a tripod that's specific to holding phones, with a head that'south fabricated for that. You lot could also just get a standard tripod plus a bracket/mount for the phone to secure it to the tripod head.
Different types
From regular standard tripods that become up to about half dozen feet tall, to specialty versions, in that location are many types of tripods. Hither are 2 tripod types you might consider when preparing to have your ain proposal photos:
- A standard tripod is a safe bet. These usually range from most six inches to six anxiety tall, with adaptable, direct legs. Remember to ensure compatibility between the head and your camera or smartphone (or get a phone holder to go with the tripod).
- A huggable or clamp-fashion tripod might be useful if yous'll be somewhere where infinite or darkening is an issue. These types volition have either bendable/moldable legs or an actual clamp. For example, if y'all're proposing in a eatery a unimposing clamping tripod would be good for attaching to a nearby table.

4. Do
Every bit I explain in my How to Propose post, it'due south of import to rehearse your proposal before actually going through with it. But if you'll exist photographing your proposal as well, then I consider it admittedly imperative that yous exercise with your photographic camera. Keep in mind that your partner might exist watching you when you actually go to execute your proposal. And if other people are around, you lot might be even more distracted!
a. Place your camera on its tripod
Outset by getting your camera physically set up on the tripod.
b. Decide how to gear up the intervalometer
Nosotros might as well starting time with the intervalometer, which volition be the key to triggering your camera to really take pictures. Exterior of professional person photographers, well-nigh people probably aren't used to using obscure camera features like an intervalometer. If this describes you, no trouble; just practice!
Setting the intervalometer to your liking is central. When I photographed my own proposal, I call back I set mine to accept two photos every three seconds. Admittedly, that is a piffling aggressive. At a minimum, I'd recommend setting your intervalometer two take at least one photo every 5 seconds.
How much storage space exercise I demand to photograph my proposal?
Let's do the math to make sure y'all take plenty storage space!
Checking my married woman'south and my iPhones, compressed (aka regular) image files range between 700 kilobytes (KB) to 971 KB. Let'south just circular that upwards to i MB, which is about yard KB. Suppose that during your proposal, you start your intervalometer using the recommended one photograph per five seconds setup from above. As an example, it took me 10 minutes when I photographed my ain proposal. In this scenario, yous'd have:
(1 photo / 5 sec) x (60 sec / 1 infinitesimal) = 12 photos/minute
(12 photos/minute) x x minutes = 120 photos
120 photos x (1 MB/photograph) = 120 MB
On an iPhone, this is less than the installed size of the Amazon app. That's neat; you'd have fifty-fifty more leeway if you're using a dedicated photographic camera because you can just use a huge memory menu. But delight consider this: the interval in my case, ane photo every v seconds, is a blank minimum.
When I proposed, I set my intervalometer for ane photograph every two seconds. Permit's do the math for that, starting with the per-minute rate:
(i photo / ii sec) x (sixty sec / one minute) = 30 photos/infinitesimal
(30 photos/minute) 10 10 minutes = 300 photos
300 photos 10 (1 MB/photo) = 300 MB
Still not likewise bad! On my iPhone, this is most the installed size of the Instagram app. Only in the adjacent section, you'll come across that I recommend shooting RAW prototype files rather than compressed one, if your telephone or photographic camera allows it. This will require a lot more storage space.
c. Get exposure and focus modes ready
In photography, exposure has cipher to practise with social media likes. Rather, information technology's the concept of exposing the digital sensor (or film) to light based on adjustments of aperture, shutter speed, and ISO. Non sounding also familiar? That's OK; only fix your camera to shoot in auto exposure manner and the camera will do its best to automatically adjust its settings based on how sunny or shady the scene is. In ProCamera, this is the style featuring an "A" in a circle.

Likewise, yous'll want to be as automatic as you can with the photographic camera's focus. This is a little easier with a real photographic camera than with a phone: yous could set the lens aperture to be somewhat small (college f-stop number) in lodge to increase the depth of field and and so place the camera in autofocus, continuous focus, or a similarly-named focus mode (or combination thereof).
Using a photographic camera app similar ProCamera, autofocus can be enabled in photo fashion past tapping in the eye of the viewfinder, and then the app will try its all-time to guess what should be in focus. I recommend starting with that as your focus plan.
d. Set the image format to RAW (if possible)
If you ever discover yourself about to hire a professional photographer, make certain that they confirm for you that they regularly shoot in a RAW paradigm format. Why? Because digital cameras, including phones, are computers which digitally represent the images they see as files. A RAW prototype file, so, is essentially a container holding "raw," unprocessed image data. It's the closest that digital cameras become to the old flick negatives of analog cameras.
And then, if your camera supports it, shoot in RAW (rather than JPEG, HEIC, etc.) to preserve as much image detail equally possible. This will help you when editing and printing the photos later. If you're using a phone, the iPhone Pros and Pro Maxes likewise as the Pixel family support this mode (no, it's not simply an app feature/setting). A premium app like the aforementioned ProCamera has a setting (every bit long every bit you have an iPhone Pro or Pro Max). With a standalone camera, just cheque your photo mode settings (if you're using a Nikon, look for the Photo Shooting Menu).
Only there's a tradeoff, specially if you're using a phone: RAW-format images are much larger than compressed (regular) ones. On my iPhone, for example, the RAW files tend to exist about 27 MB in size. As I showed before, y'all may end up with hundreds of photos existence saved to your phone (or camera retention card) over the form of the proposal. Using the math from earlier:
300 photos x (27 MB/photo) = 8100 MB = approx. 8.1 GB
That'due south about 3 times the installed size of the iOS Podcasts app on my telephone (and I don't fifty-fifty recall I have any podcasts downloaded right now). Plain, you'll eventually go through these photos, proceed the best ones, and delete the residuum. Simply, make sure that your phone has plenty of available storage.
five. Verify Camera Settings and Pack Up
OK, at this point, you lot're getting close to the proposal 24-hour interval. The twenty-four hour period earlier (or the morning of; whatever makes the most sense for you), you'll want to double-cheque your camera settings and storage.
Just go with the listing we established while practicing:
- Grab the tripod; you don't desire to forget this.
- Set up the intervalometer.
- Double-check the exposure and focus modes.
- If possible/bachelor, make sure the image format is RAW.
Lastly, brand sure that your phone (or photographic camera's retention carte) has ample storage infinite available.
Programme for introducing the camera
One more thing nosotros should cover is how to factor the camera into your actions and script. Moving-picture show your proposal scenario and visualize at what betoken you'd similar to take the photographic camera and tripod out. Every bit every bit important as your timing volition be what you say while doing this. A couple of ideas for bringing the photography up somewhat naturally are:
- "I was thinking we could have some nice selfies while we're here. Give me a second and I'll fix my camera up."
- "I'm trying to go more serious with photography, so requite me a quick second to practice on us."
My other proposal mail has some more help for figuring out your proposal script. By the way, don't exist afraid to accept your partner on a couple of dates first in guild to exercise.
half-dozen. Edit and Protect Those Photos
Afterward all this prep and practice, it'll be fourth dimension to merely exercise it. It will exist exciting, simply just remember what y'all've learned hither, so finalize all of your proposal planning earlier asking the all-important question of your partner. Just remember this: in one case yous've proposed, the job of photographing your own proposal isn't quite over still.

Once the act is done, exist sure to edit and support your keepers. Both iOS Photos and Google Photos provide simple, semi-automatic solutions to both of those tasks. These two steps are like shooting fish in a barrel, only are oftentimes disregarded. Exercise expert data hygiene and create copies!
Now before yous become, read on for what it was like when I photographed my ain proposal. First though, here'south another take…
Why Yous Should Rent a Proposal Photographer Instead
In giving this communication, I've done my best to be transparent. Yes, you tin definitely photograph your own proposal; I'm about to prove you how I did information technology in the next section of this mail. But, you might want to consider hiring a professional proposal photographer instead.
You literally only accept 1 shot at this. Furthermore, the fact that yous're reading this post indicates that y'all desire your proposal to be captured right! So, please, if y'all have any doubts nearly following this guide and pulling off your ain proposal photography, just rent someone.
Finding a proposal photographer is pretty piece of cake. I have a post for how to notice the perfect wedding photographer; many offer proposal services, likewise.
If yous're in the northeast and ready to advise, just drop me a line! When I piece of work with proposal clients, I plan with them, capture the magic moment, and then have them jump right into an engagement session. 1 of my proposals actually got published on The Knot'southward How They Asked.
Maybe information technology's best to hire a proposal photographer…
In that location's but one chance to capture your proposal correct, and so consider hiring a proposal photographer instead. If you're in Connecticut or nearby, I can help with that! But transport me an email and let's talk information technology over.
Trust me, it's worth the investment to hire a proposal photographer!
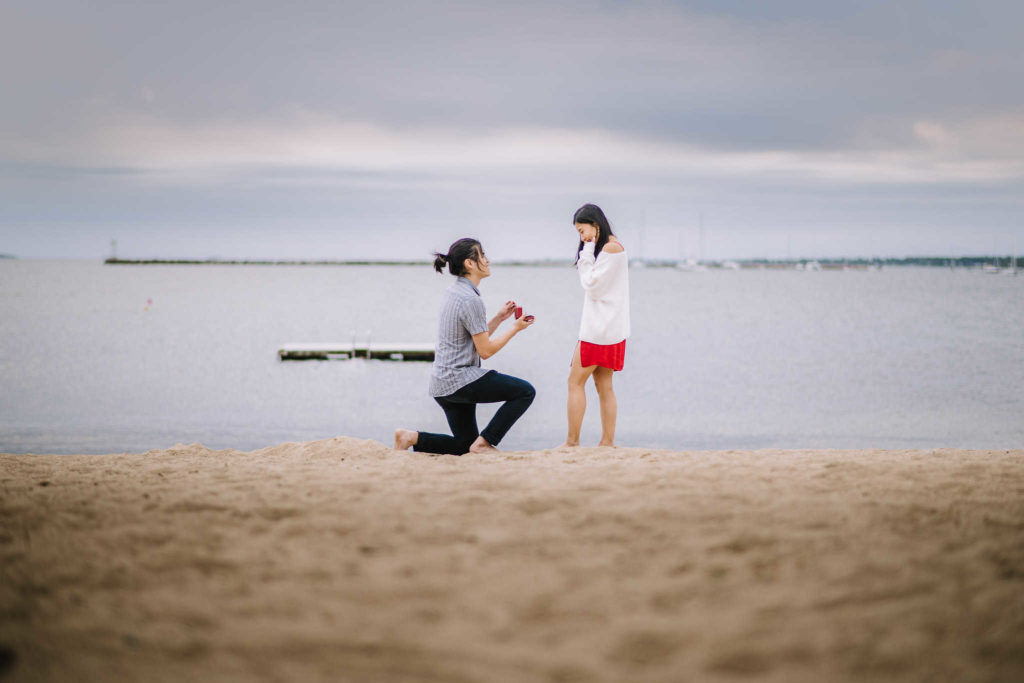
How I Took My Own Marriage Proposal Photos
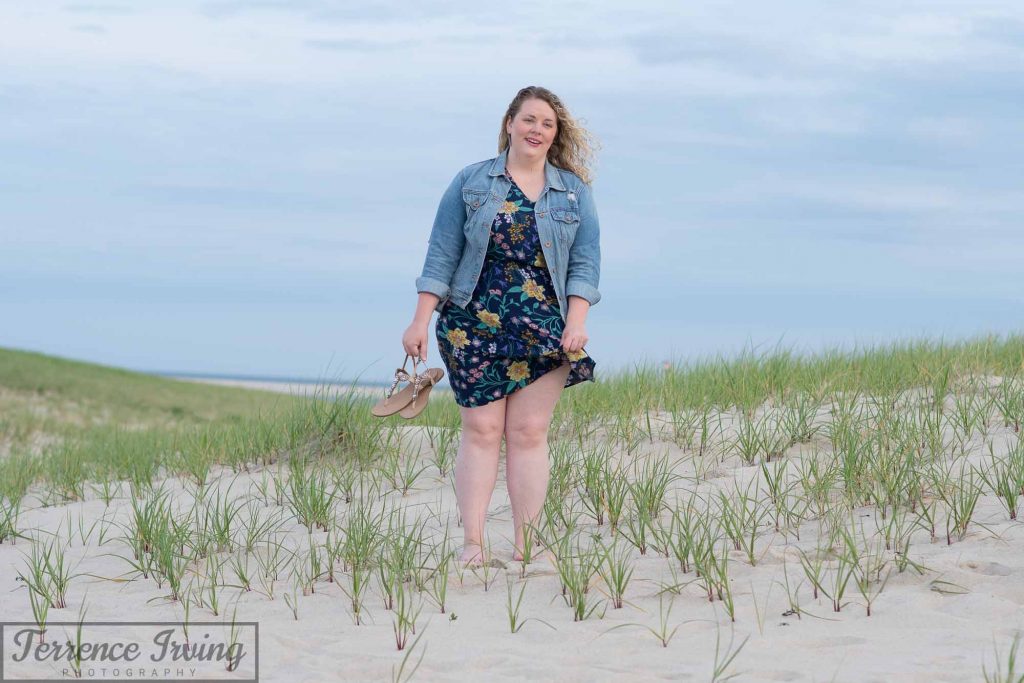
When nosotros were dating, my now-married woman and I enjoyed taking New England route-trips when nosotros could. In 2022, we decided to take a trip to Cape Cod early that the leap, before the busy flavour started. We settled on Chatham and booked our stay at the lovely Chatham Cabin. Nosotros planned our trip to be off season and it worked out; there was none of the nightmare Cape traffic I'd heard about. Besides, near of the time, things were pretty calm.
It was Saturday, June two, 2022 and nosotros had just spent the day exploring Chatham and Provincetown. Nosotros headed back to the cabin in the late afternoon to program our night. I proposed that we brand dinner reservations and head down to the beach, merely below Chatham Lighthouse, for some nice photos of ourselves before eating. Luckily for me, beingness on vacation gives me a good excuse to have a camera with me constantly. And so, I know she didn't suspect a thing when I suggested that we take some selfies of us with my "existent" camera.
The Embankment: Setting upwards the Photographic camera
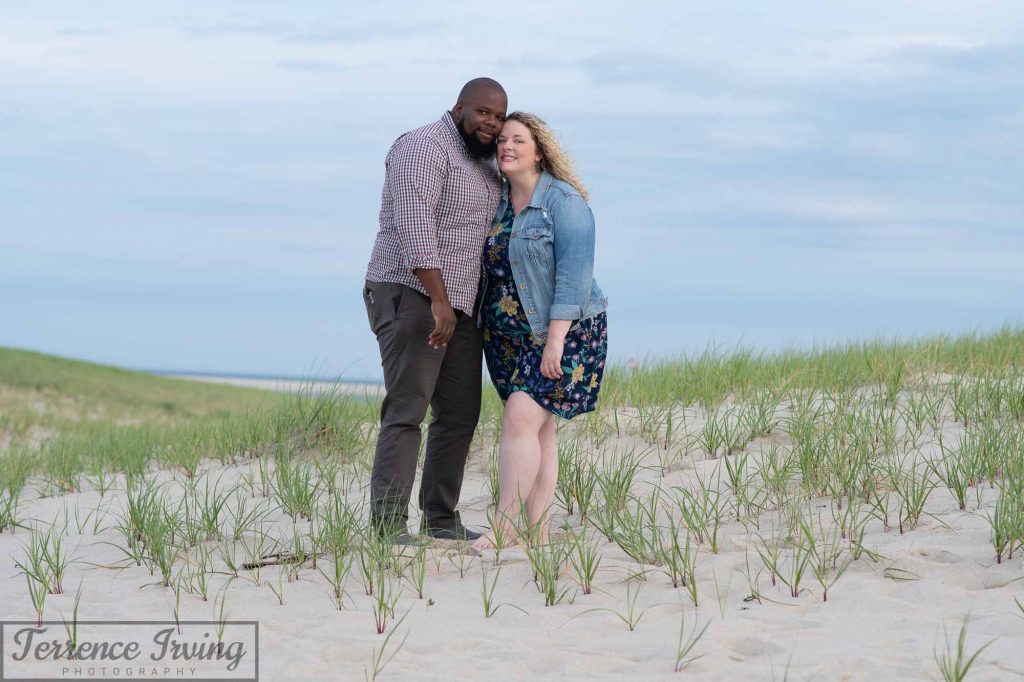
One time we arrived at the beach, I took a few test shots of MaryKate to become things going.

Afterward a few minutes, I set things up to endeavour and capture our ain wedlock proposal photo. So, what was the key? A few people asked me on Facebook how I did this. In that location were really three central tools involved, all of which I discussed earlier in this post:
- A tripod. Before I was shooting weddings and engagement sessions at a high rate, I was focused on landscapes. A tripod was usually with me.
- An intervalometer. Fortunately, the photographic camera I had with me for our proposal had a built-in intervalometer.
- Creativity. Look, I'1000 non trying to pat myself on the dorsum or toot my own horn. But without creativity, this wouldn't have worked at all. Planning helped!
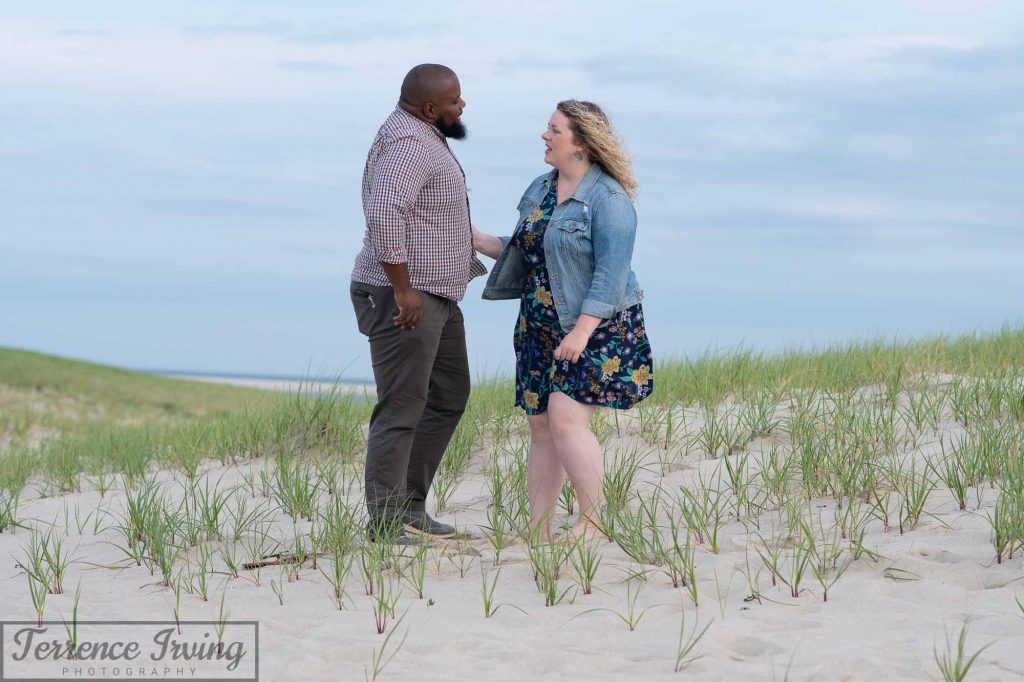
The Build-up: Working Up to the Marriage Proposal Photo
In one case the camera was fix, I was probably shaking quite a bit. And then, I started cracking some jokes to keep things light. And then I made fashion over to join MaryKate in frame.
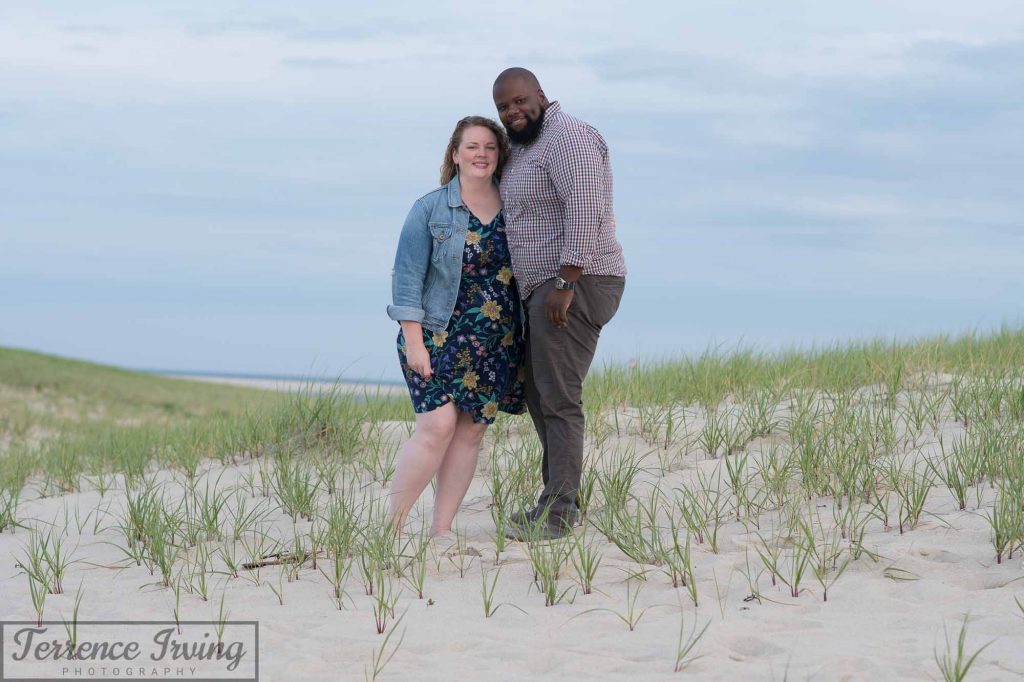
I was too nervous to retrieve that MaryKate's got a "side." No problem, she reminded me and we switched. Yous can probably guess that this role wasn't function of my proposal script.
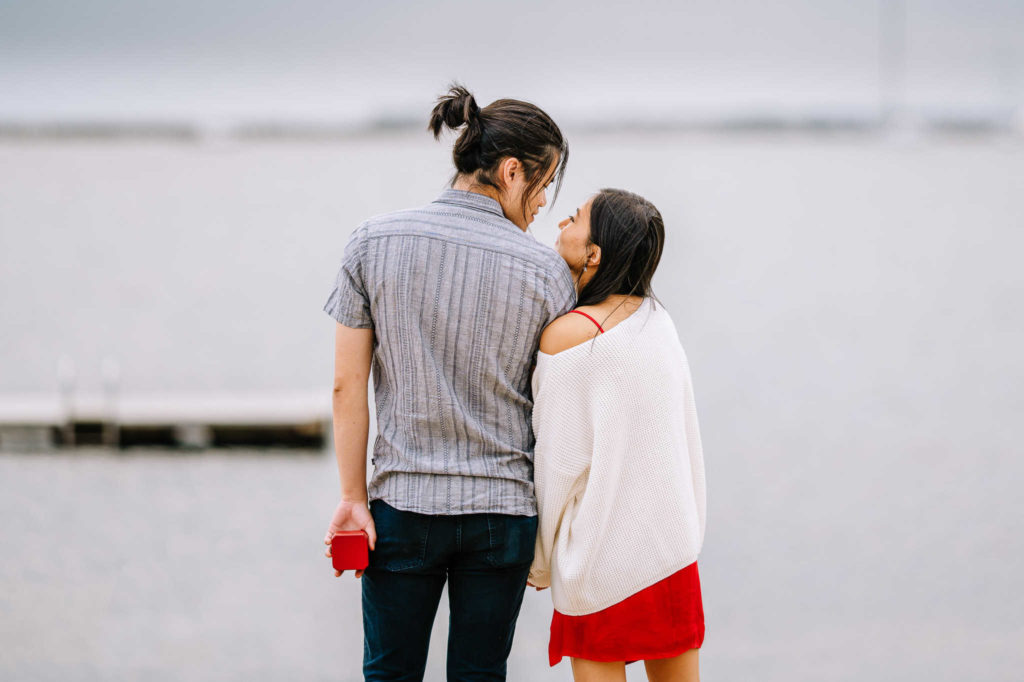
Now, y'all might be wondering where the ring was. Look closely at my right pant pocket; information technology's a little too foursquare for a normal pair of pants.
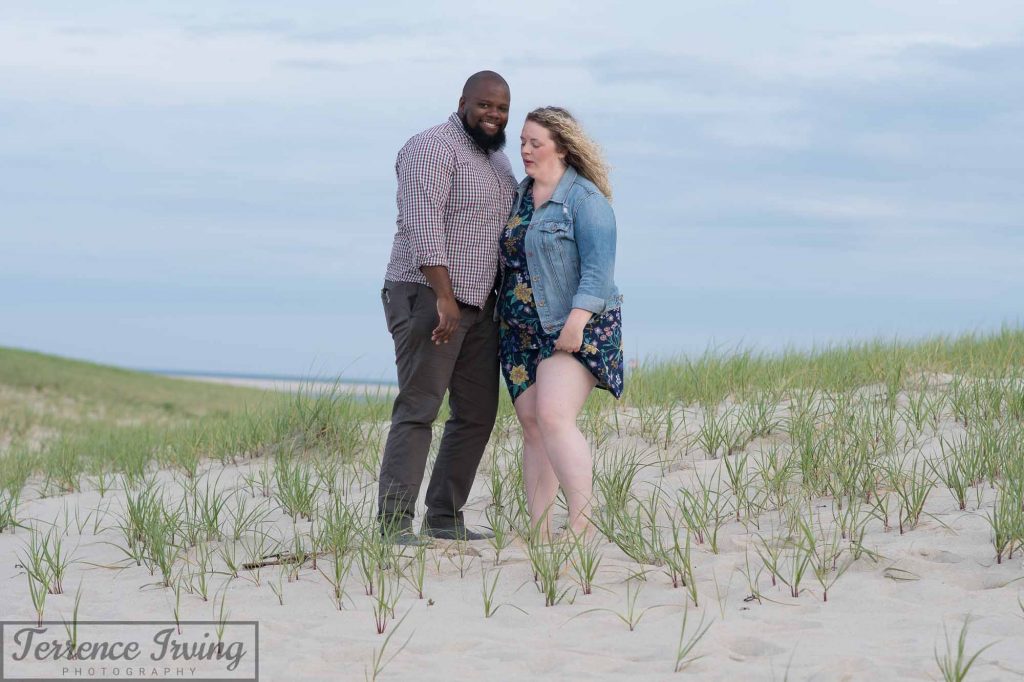
Game Time: Starting the Script
Well, information technology was fourth dimension to exercise this. With the camera still firing away, I started to become into position…
Now, remember that the wind is whipping away at us, meanwhile there were a few other people nowadays on the beach that night. The indicate is that I THOUGHT the camera was still taking pictures, just it was a little hard to hear the telltale "snap" of the shutter. It wasn't exactly appropriate or feasible to say, "concord on a 2nd, I'll be right back." Similar I mentioned earlier, the photos were secondary to the actual proposal moment itself. The show had to go on!

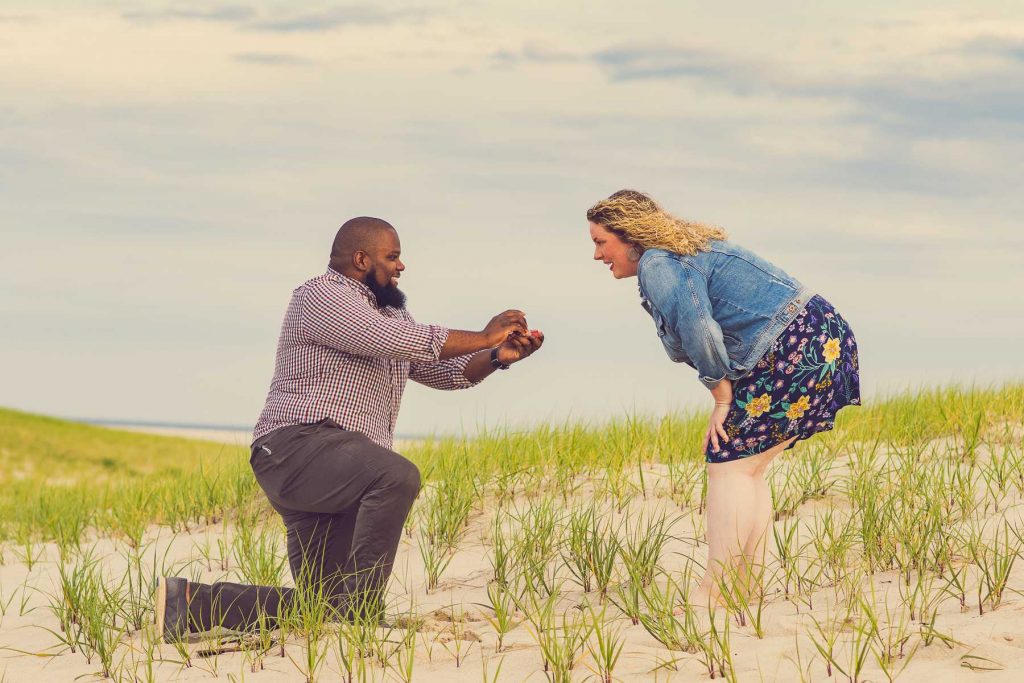
And finally, the moment had come up. If you've followed my photography at all, and then this one should look familiar to you!
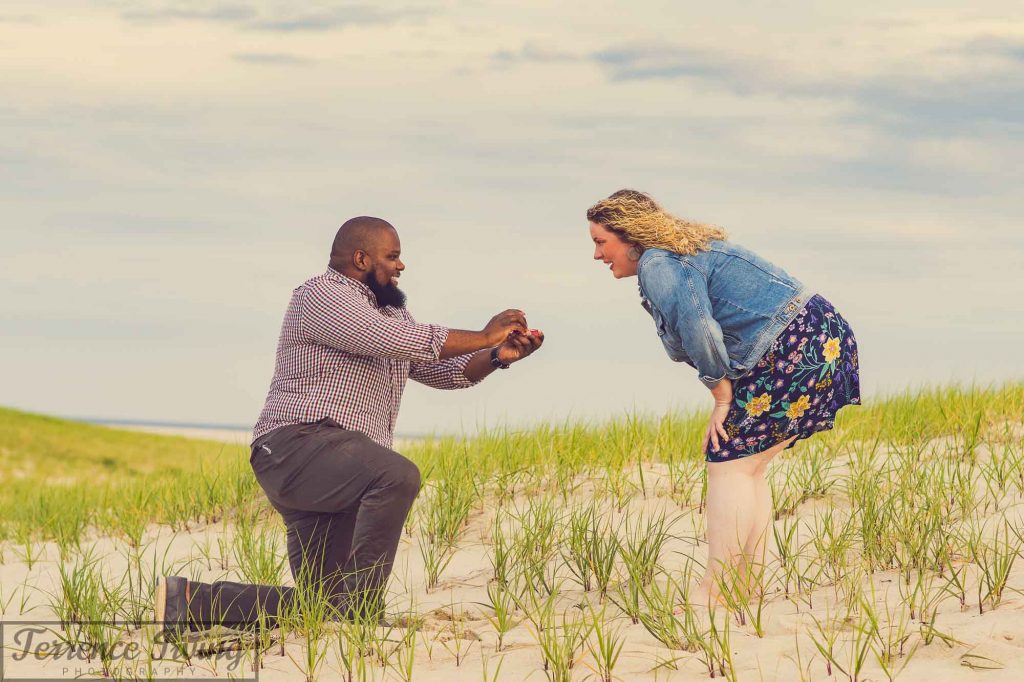
When I edited it, I really wanted to accentuate what I saw that day, which was a gentle blue sky, vivid green grass shoots, and the await on my fiance'south face as she looked at the ring!
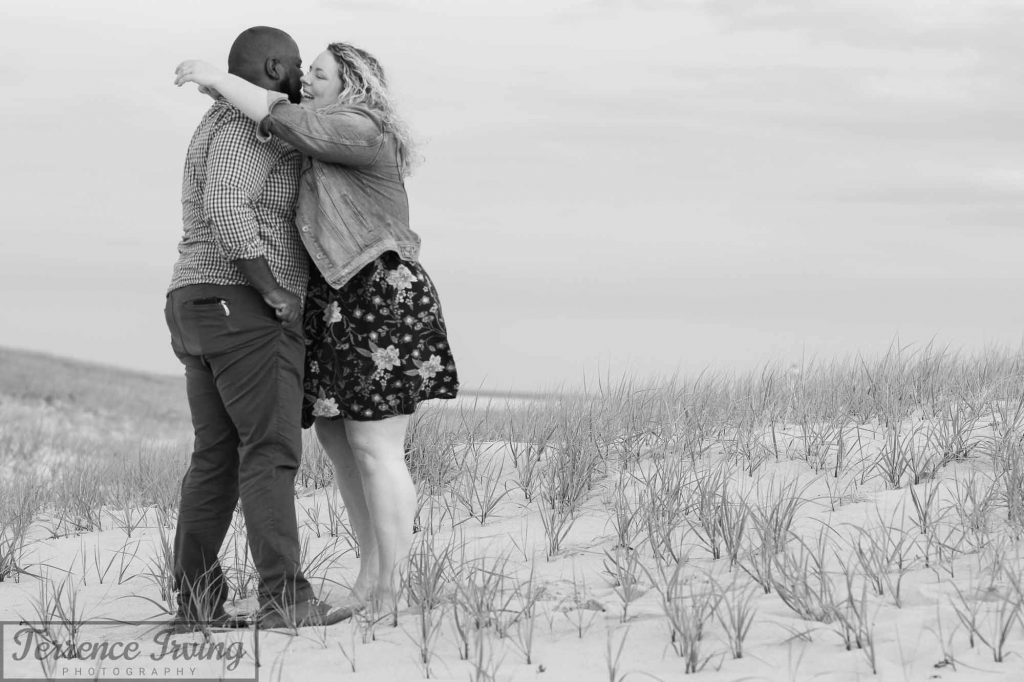
The Aftermath: Proof of Concept
Just to prove that this wasn't a large setup, here'south a couple of photos of what happened next:

She said, "Yes!" Tin can you imagine how bad-mannered dinner would have been if she didn't?
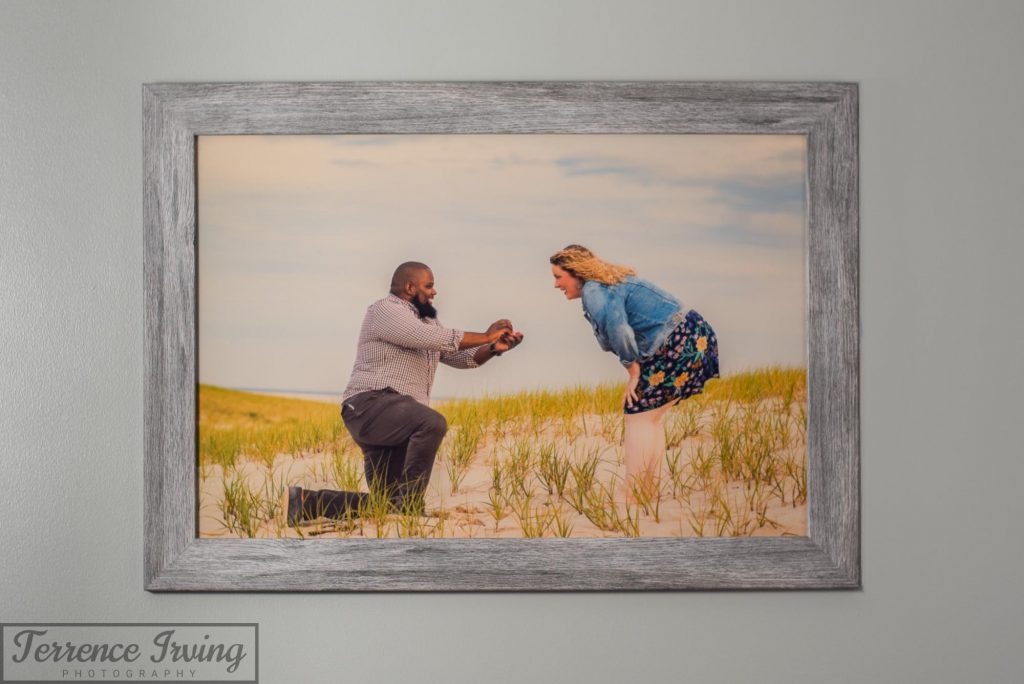
And I'll leave y'all with this, which is hanging on our living room wall (call up to print your photos):
Do you lot need a proposal or wedding photographer?
After reading this guide, possibly you've decided that you'd rather hire a pro, or possibly you'd like to take the DIY route and so check in after near wedding photography. I tin assistance with either of those! Merely click below for more info or my contact page.
And don't forget to follow me on social media!
Source: https://www.tirvingphoto.com/engagement-and-proposal/own-marriage-proposal-photo/
0 Response to "How To Set Up Camera For Proposal"
Post a Comment